Month: September 2025

jeep wrangler jk hardtop seal kit instructions

Installing a Jeep Wrangler JK hardtop seal kit is crucial for preventing leaks and ensuring a weather-tight fit. This guide provides step-by-step instructions for a successful installation, emphasizing proper techniques and tools to achieve a durable seal. Follow these directions carefully to maintain your Jeep’s interior protection and overall performance.

Overview of the Hardtop Seal Kit

The Jeep Wrangler JK hardtop seal kit is designed to ensure a weather-tight fit and prevent leaks. It typically includes a foam blocker seal, double-sided tape, and adhesive components. The kit is engineered to protect your Jeep’s interior from water, dust, and noise. High-quality materials, such as UV-resistant polyurethane, provide durability and long-lasting performance. The seal kit is easy to install with basic tools and is tailored to fit your JK hardtop perfectly. Proper installation ensures a secure and leak-free connection, enhancing both comfort and safety while driving. This kit is essential for maintaining your Jeep’s reliability and interior condition, especially during off-road adventures or harsh weather conditions.

Importance of Proper Installation

Proper installation of the Jeep Wrangler JK hardtop seal kit is essential for ensuring optimal performance and longevity. A well-sealed hardtop prevents water intrusion, reducing the risk of interior damage and electrical issues. Additionally, it minimizes wind noise during driving, enhancing comfort and driving experience. Correct installation also preserves the structural integrity of the hardtop, maintaining your Jeep’s overall safety and reliability. Improper sealing can lead to leaks, rust, and costly repairs. By following the instructions carefully and using the correct tools, you can achieve a secure and durable seal, ensuring your Jeep remains protected and performs at its best for years to come.

Preparation and Safety Precautions

Before starting the installation, ensure a clean and well-ventilated workspace to avoid inhaling solvent fumes. Remove the old gasket and thoroughly clean the surface area with a good solvent to eliminate dirt, grime, and old adhesive. Wear protective gloves and goggles to prevent skin and eye irritation. Gather all necessary tools and materials, including the new seal kit, double-sided tape, and solvent. Properly align the new seals with the hardtop to ensure a precise fit. Follow manufacturer instructions for applying adhesive and preparing the surface. Improper preparation can lead to installation errors or leaks. Taking these precautions ensures a smooth and successful installation process, protecting both you and your Jeep from potential damage.

Removing the Old Gasket

Remove the old gasket carefully, clean the surface with a solvent, and inspect for debris. Ensure the area is dry and ready for the new seal.

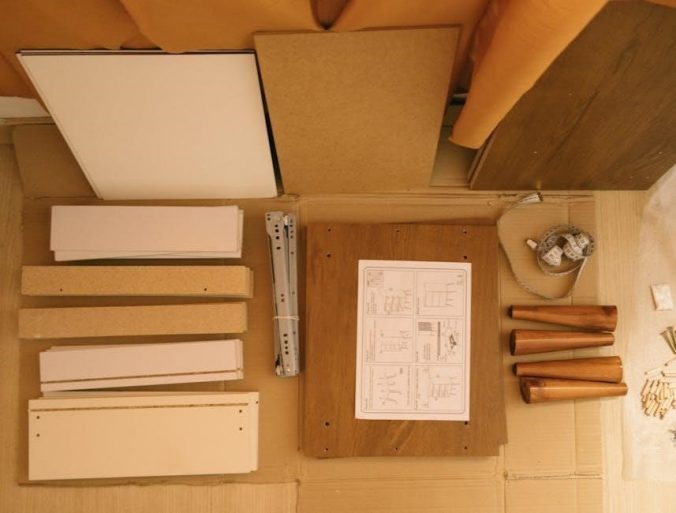
Tools and Materials Needed

To successfully install the Jeep Wrangler JK hardtop seal kit, gather the necessary tools and materials. You will need a trim removal tool to safely detach the old gasket without damaging the surrounding trim. A good-quality solvent cleaner is essential for thoroughly cleaning the surface area, ensuring proper adhesion of the new seal. Double-sided tape, included with most kits, aids in securing the seal. Additional materials like a utility knife for trimming excess sealant, rags for cleaning, and gloves for protection are also recommended. Ensure you have the complete hardtop seal kit, which typically includes the foam blocker seal and adhesive strips. Refer to the manufacturer’s instructions for any specific tools or materials required. Proper preparation ensures a smooth and effective installation process.

Cleaning the Surface Area

Cleaning the surface area is a critical step before installing the new seal. Use a high-quality solvent cleaner to thoroughly wipe down the hardtop and door frame surfaces where the seal will be applied. This removes dirt, grease, and old adhesive residue, ensuring optimal adhesion. Pay special attention to the areas around the edges and corners, as these are common spots for debris to accumulate. Use lint-free rags to avoid leaving behind fibers or residue. Once cleaned, inspect the surface to ensure it is completely dry and free of contaminants. A clean surface guarantees a proper seal, preventing leaks and ensuring long-lasting performance. This step is essential for achieving a professional-grade installation. Always follow safety precautions when handling cleaning solvents. Proper preparation ensures the best results.

Inspecting the Hard Top Surface

Inspecting the hard top surface is essential to ensure it is in good condition for the new seal. Look for scratches, dents, or rust spots that could interfere with the seal’s adhesion. Check for any uneven areas or old adhesive residue that may have been missed during cleaning. If you find significant damage, address it before proceeding. Light scratches can be sanded smooth, while deeper imperfections may require additional repairs. Ensure the surface is even and free of debris, as this will directly impact the seal’s performance. A thorough inspection now saves time and frustration later, ensuring a leak-free and secure fit for your Jeep Wrangler JK hardtop. This step is vital for achieving a professional-grade installation and maintaining the integrity of your vehicle. Always prioritize a smooth, even surface for optimal results. Proper inspection ensures long-lasting performance and reliability;

Preparing the New Seal Kit

Unpack the seal kit and inspect all components for damage. Organize parts according to their application areas. Refer to the manufacturer’s instructions for specific preparation steps. Ensure all adhesives and surfaces are ready for installation. Proper preparation guarantees a seamless installation process.

Understanding the Components of the Seal Kit

The Jeep Wrangler JK hardtop seal kit typically includes a foam blocker seal, double-sided adhesive tape, corner seals, and additional adhesive strips. Each component plays a crucial role in ensuring a watertight fit. The foam blocker seal runs along the hardtop’s edges, providing a soft, flexible barrier against leaks. The double-sided tape secures the foam seal firmly to the hardtop. Corner seals are designed to reinforce high-stress areas where leaks are most common. Adhesive strips may be included for extra sealing protection. It’s essential to familiarize yourself with each part to ensure proper installation. Always refer to the kit’s instructions for specific component details, as variations may exist between manufacturers. Proper identification of each piece ensures a precise and effective installation process.

Aligning the Seals with the Hard Top

Aligning the seals with the hard top is critical for a leak-free fit. Start by placing the foam blocker seal along the hard top’s edges, ensuring it matches the contour precisely. Use the reference marks or notches on the seal to guide proper positioning. Gently press the seal into place, beginning at the corners and working your way along the edges. Double-check that the seal is evenly spaced and not twisted. For accurate alignment, use a straight edge or ruler to verify the seal’s position relative to the hard top’s frame. If necessary, adjust the seal slightly before applying pressure. Proper alignment ensures a tight, even seal and prevents gaps that could lead to leaks. Always refer to the manufacturer’s diagrams for specific alignment guidance.

Applying Adhesive and Preparing the Surface

Before installing the new seal, ensure the surface is clean and dry. Use isopropyl alcohol to wipe away dirt, grease, or old adhesive residue. Allow the surface to dry completely to ensure proper adhesion. Apply a thin, even layer of adhesive to the back of the seal, following the manufacturer’s instructions. Avoid over-saturating the material, as this could compromise the seal’s performance. Let the adhesive sit for a few minutes until it becomes tacky to the touch. This step ensures a strong bond between the seal and the hard top. Once ready, carefully align the seal with the hard top’s edges, pressing firmly to secure it in place.

Installation Process

The installation process involves carefully peeling the backing from the seal, aligning it with the hardtop edges, and pressing firmly to ensure a tight fit. Follow instructions precisely to achieve a proper seal and prevent leaks.

Step-by-Step Guide to Installing the Seal

Begin by carefully peeling the backing from the seal, ensuring it remains aligned with the hardtop edges. Press firmly along the length to secure it. Next, apply the double-sided tape around the perimeter, smoothing out any air bubbles. Position the foam blocker seal along the top edge, ensuring it fits snugly. Double-check the alignment to prevent gaps. Use a rubber roller to apply even pressure across all surfaces for a tight seal. Finally, inspect the entire area to ensure proper adhesion and make any necessary adjustments. Allow the adhesive to set according to the manufacturer’s instructions before testing for leaks.

Using the Double-Sided Tape

Start by thoroughly cleaning the surface where the double-sided tape will be applied to ensure proper adhesion. Peel the backing from the tape and align it with the designated area on the hardtop, pressing firmly to secure it. Use a credit card or similar tool to smooth out any air bubbles, ensuring full contact. Apply even pressure across the entire length to activate the adhesive. Avoid stretching the tape during application, as this can weaken its bond. Once applied, inspect the tape for any gaps or misalignment. Allow the tape to set for a few minutes before proceeding with the seal installation. Proper application ensures a strong bond and a leak-free seal.

Securing the Foam Blocker Seal

After applying the double-sided tape, carefully place the foam blocker seal along the designated edge of the hardtop. Ensure it aligns perfectly with the tape, starting from one corner and working your way around. Gently press the foam into place, making sure it sits flush with the surface. Use your fingers to apply even pressure, ensuring it adheres securely without twisting or bunching. Inspect the seal for any gaps or overlaps. If necessary, trim excess foam with a utility knife for a precise fit. Properly securing the foam blocker seal is crucial for maintaining a tight, weatherproof connection between the hardtop and the vehicle. This step ensures long-term durability and performance of the seal.

Ensuring Proper Alignment and Fit

Proper alignment is critical to ensure the seal functions as intended. Before finalizing, visually inspect the seal’s position relative to the hardtop and vehicle frame. Use a level to confirm the hardtop is properly aligned with the Jeep’s body. Check the entire perimeter to ensure the seal is evenly spaced and not twisted. If misaligned, gently adjust the hardtop or the seal without forcing it, as this could damage the adhesive or the surface. A proper fit ensures a watertight seal and prevents wind noise. Once aligned, perform a test fit by closing the hardtop gently to verify the seal makes even contact across all edges. This step is essential for achieving a leak-free and secure installation.

Post-Installation Checks

After installation, inspect the seal for proper fit and adhesion. Check for any visible gaps or air leaks. Test by spraying water on the seals to ensure watertightness. Verify all components are securely fastened and aligned. Perform a final visual inspection to confirm everything is in place and functioning correctly. This step ensures the hardtop seal performs optimally and prevents future issues.

Inspecting the Seal for Proper Fit

After installing the new seal, carefully inspect it to ensure a tight, even fit. Check for any gaps between the seal and the hardtop, as well as proper alignment with the door and window frames. Verify that the seal lies flat and smooth, with no wrinkles or creases. Inspect all corners and edges for proper adhesion and compression. Use a flashlight to examine hard-to-see areas for any signs of misalignment or air leaks. If any issues are found, gently adjust the seal or consult the instruction manual for troubleshooting steps. A proper fit ensures optimal performance and prevents water intrusion or noise during driving.

Testing for Leaks

After installing the seal, test for leaks to ensure the hardtop is watertight. Start by spraying water with a hose around the edges of the hardtop while another person inspects the interior for water droplets. Pay special attention to areas prone to leaks, such as corners and panel gaps. Use a flashlight to examine the seals from inside the Jeep. If water enters, mark the leak location for further adjustment or resealing. Repeat the test until no leaks are detected. This step is critical to confirm the seal’s effectiveness and prevent water damage or noise during driving. A leak-free hardtop ensures a secure and enjoyable driving experience in all weather conditions.

Final Adjustments and Tightening

After installing the seal, perform final adjustments to ensure a snug fit. Gently press the hardtop to check alignment and make sure it sits evenly. Use a rubber mallet to tap the top into place if necessary. Tighten all hardware securely, but avoid over-tightening, which could damage the hardtop or seals; Use a torque wrench to ensure bolts are tightened to the manufacturer’s specifications (typically 10-15 ft-lbs). Double-check the door seals and alignment to confirm proper fitment. Make any minor adjustments to the seals for optimal performance. Proper tightening ensures long-term durability and prevents gaps that could lead to leaks or noise. Final checks are essential for a secure and reliable hardtop installation.

Maintenance and Care

Regularly inspect and clean the seals to ensure optimal performance. Check for dirt, dust, or debris that may affect the seal’s integrity. Use mild soap and water for cleaning, avoiding harsh chemicals. Inspect the seals every 3-6 months or after heavy off-road use. Replace any worn-out parts promptly to maintain a leak-free seal. Store the hardtop in a dry, protected area when not in use to prevent damage. Avoid using abrasive materials that could scratch the seals. Follow these steps to extend the life of your Jeep Wrangler JK hardtop seal kit and ensure long-term reliability.

Cleaning and Inspecting the Seal Regularly

Regular cleaning and inspection of the Jeep Wrangler JK hardtop seal are crucial for maintaining its performance and preventing leaks. Use mild soap and water to gently wipe down the seals, removing dirt, dust, or debris that may accumulate. Avoid using harsh chemicals or abrasive materials, as they can damage the rubber or foam components. Inspect the seals every 3-6 months or after heavy off-road use for signs of wear, such as cracks, tears, or compression loss. Pay special attention to the areas where the seal meets the hardtop and the double-sided tape. Cleaning and inspecting regularly ensures the seal remains tight and leak-free, preserving the integrity of your Jeep’s hardtop.

Replacing Worn-Out Parts

Replacing worn-out parts of the Jeep Wrangler JK hardtop seal kit is essential to maintain its effectiveness and prevent leaks. Over time, the foam blocker seal and double-sided tape may degrade due to weather exposure or heavy use. Inspect these components regularly for signs of wear, such as cracks, tears, or loss of adhesion. If damage is detected, replace the affected parts immediately to ensure a tight seal. Keep spare parts handy, especially if you frequently remove or reinstall the hardtop. Regular replacement prevents water intrusion and maintains the structural integrity of the seal. Always use high-quality, compatible components to guarantee optimal performance and longevity of the hardtop seal kit. Timely replacements will save you from costly repairs and ensure a leak-free driving experience.

Storage and Protection Tips

Proper storage and protection of the Jeep Wrangler JK hardtop seal kit are crucial to maintain its condition and longevity. When not in use, store the seal kit in a cool, dry place away from direct sunlight and moisture. Use airtight containers or plastic bags to protect the components from dust and debris. Avoid bending or folding the seals, as this may cause creases or damage. Clean the seals with a soft cloth and mild soap before storage to remove dirt and contaminants. Never expose the kit to harsh chemicals or extreme temperatures. For added protection, consider placing the seals on a flat surface to prevent warping. Regularly inspect the stored parts for signs of degradation and replace them if necessary. Proper storage ensures the seal kit remains ready for use and maintains its performance over time.

Troubleshooting Common Issues

Troubleshooting common issues with your Jeep Wrangler JK hardtop seal kit involves identifying leaks, addressing misalignment, and handling adhesive failures. Refer to specific sections below for detailed solutions.

Identifying and Fixing Leaks

Identifying leaks in your Jeep Wrangler JK hardtop seal kit is crucial for maintaining a watertight and dust-free interior. Start by visually inspecting the seals for cracks, gaps, or misalignment. Use a garden hose to simulate rain and observe where water enters the vehicle. Common leak areas include the corners, edges, and drain channels. Clean the affected area thoroughly with a mild detergent to ensure proper adhesion. For minor gaps, apply a small amount of silicone-based sealant. If the leak persists, remove the old seal and reinstall it, ensuring proper alignment and pressing firmly for optimal adhesion. Regularly inspect and maintain the seals to prevent future leaks and ensure long-lasting performance.

Addressing Adhesive Failures

Adhesive failures in the Jeep Wrangler JK hardtop seal kit can lead to leaks and reduced performance. To address this, clean the surface thoroughly with isopropyl alcohol to remove dirt, oil, or old adhesive residue. Ensure the surface is dry before proceeding. Apply a small amount of new adhesive or a high-quality automotive primer to the back of the seal. Press the seal firmly onto the hardtop, starting from the center and working outward to eliminate air bubbles. Allow the adhesive to cure for 24 hours before exposing the vehicle to moisture. Regularly inspect the adhesive for wear and reapply as needed to maintain a secure seal. Proper adhesion is essential for long-term durability and leak prevention.

Dealing with Misaligned Seals

Misaligned seals can compromise the effectiveness of your Jeep Wrangler JK hardtop seal kit. To correct this, start by gently pulling back the misaligned portion and realigning it with the hardtop’s edge. Use a heat gun to soften the adhesive if the seal is stubborn. Once realigned, press firmly to ensure proper adhesion. Regularly inspect the seals for shifting, especially after off-road adventures. If the misalignment persists, remove the seal, clean the area, and reinstall it, ensuring it sits flush with the surface. Proper alignment is crucial to prevent leaks and ensure a tight fit. Addressing misalignment promptly will extend the life of your seal kit and maintain your Jeep’s weatherproofing.

Advanced Tips and Tricks

For optimal results, use high-quality materials and consider custom fitting your seals for enhanced performance. Apply additional sealants sparingly to avoid compromising the kit’s design.

Using Additional Sealants for Extra Protection

Applying additional sealants can provide extra protection against leaks and weathering. Use a high-quality silicone or polyurethane-based sealant, ensuring compatibility with your Jeep’s materials. Apply a thin layer to the edges or corners of the hardtop where leaks are most common. Avoid over-application, as it may interfere with the seal kit’s fit. Allow the sealant to cure fully before reinstalling the hardtop. This step adds an extra layer of security, especially in extreme weather conditions. Always follow the manufacturer’s instructions for the sealant to maintain warranty validity and ensure optimal performance. This method is particularly effective for addressing persistent leaks or enhancing durability over time.

Upgrading to High-Quality Materials

Upgrading to high-quality materials enhances the performance and longevity of your Jeep Wrangler JK hardtop seal kit. Premium materials, such as heavy-duty rubber or silicone, offer superior durability and weather resistance compared to standard options. Look for EPDM rubber, known for its excellent resistance to UV rays, temperature fluctuations, and moisture. These materials ensure a tighter seal, reducing the risk of leaks and noise. When upgrading, focus on critical areas like the edges and corners, which are prone to wear. Always follow manufacturer guidelines for compatibility and installation. Upgrading not only improves functionality but also provides peace of mind for long-term reliability. Consider consulting a professional for complex upgrades to ensure a flawless installation.

Customizing the Seal for Better Performance

Customizing the seal on your Jeep Wrangler JK hardtop can significantly enhance its performance and durability. One effective method is to trim the seals to fit specific areas, ensuring a precise and tight fit. Additional adhesive layers or specialized weatherproofing tapes can also be applied for extra protection. For improved noise reduction and leak prevention, consider reinforcing high-stress areas with additional foam inserts. Always use precision tools, such as a utility knife or cutting mat, to achieve clean cuts and avoid damaging the material. Customizing the seal not only improves functionality but also extends its lifespan. By tailoring the seal to your Jeep’s unique needs, you can enjoy a quieter, drier, and more comfortable driving experience. Regular inspection and adjustments are key to maintaining optimal performance.

Final Thoughts on the Installation Process

Installing a Jeep Wrangler JK hardtop seal kit is a manageable process for DIY enthusiasts and professionals alike, as long as you follow the instructions carefully. Patience and attention to detail are crucial to ensure a proper seal and optimal performance. By taking the time to clean, inspect, and align the components correctly, you can avoid common issues like leaks or misalignment. Remember, a well-installed seal kit not only enhances your driving experience by reducing noise and preventing water intrusion but also protects your vehicle’s interior from the elements. Take pride in your handiwork and enjoy the satisfaction of a job well done, knowing your Jeep is now better equipped for adventures ahead.

Importance of Following Instructions

Following the instructions for your Jeep Wrangler JK hardtop seal kit is essential for achieving a successful installation. Properly executed steps ensure the seal performs as intended, preventing leaks and maintaining a quiet, dry cabin. Deviating from the guide can lead to poor alignment, adhesive failures, or compromised weatherproofing. Clear instructions are designed to address common challenges and streamline the process, making it crucial to adhere to them closely. By doing so, you avoid costly rework and ensure long-lasting performance. Taking the time to follow each step meticulously guarantees a professional-grade result, enhancing both functionality and durability. Remember, precision and patience are key to a flawless installation and years of trouble-free use.

Enjoying a Leak-Free Jeep Experience

A properly installed Jeep Wrangler JK hardtop seal kit ensures a leak-free driving experience, enhancing both comfort and enjoyment. With a secure and watertight seal, you can confidently navigate through rain, snow, or off-road adventures without worrying about moisture intrusion. A leak-free cabin reduces noise, prevents damage to interior components, and maintains a clean, dry environment. This not only protects your vehicle but also preserves its resale value. By following the installation guide and maintaining the seals, you can enjoy uninterrupted adventures in your Jeep, knowing your hardtop is sealed to perfection. A leak-free experience is the ultimate reward for meticulous installation and regular upkeep, allowing you to focus on the thrill of the drive.

soccer drills for 5 year olds pdf

Introducing fun soccer drills for 5-year-olds is essential to foster a love for the game while developing fundamental skills. Age-appropriate activities ensure engagement and skill development, creating a positive foundation for young players to grow confidently in teamwork and sportsmanship.

Overview of Soccer Drills for 5-Year-Olds

Soccer drills for 5-year-olds are designed to be fun, engaging, and age-appropriate, focusing on developing basic skills like dribbling, passing, and shooting. These activities are structured to promote teamwork, coordination, and spatial awareness while keeping young players entertained. Drills often incorporate games and creative challenges, such as dribbling through cones or scoring goals, to foster a love for the sport. The emphasis is on simplicity and safety, ensuring that children build confidence and foundational skills. Coaches and parents can use these drills to create a positive learning environment, helping kids develop both physically and socially. Fun and variety are key to keeping young players motivated and excited about soccer.

Importance of Age-Appropriate Training

Age-appropriate training is crucial for 5-year-olds, as it ensures drills are tailored to their developmental stage. This approach fosters confidence, teamwork, and a basic understanding of soccer. Young players thrive when activities are simple, safe, and engaging, allowing them to build motor skills and coordination naturally. Introducing complex strategies too early can lead to frustration, while age-specific drills keep children excited and motivated. Coaches and parents should focus on creating a positive, supportive environment where kids can explore the game at their own pace. This foundation sets the stage for future skill development and a lifelong love for soccer.

Setting Realistic Expectations

Setting realistic expectations is vital when coaching 5-year-olds, as they are still developing their motor skills and understanding of the game. At this age, the focus should be on fun and basic soccer skills, rather than competitive outcomes. Coaches and parents should recognize that young players may have varying attention spans and physical abilities. Drills should be simple, safe, and engaging, with an emphasis on participation and enjoyment. It’s important to celebrate effort and progress, no matter how small, to build confidence and a positive attitude toward the sport. Mastery of skills will come with time and practice, so patience and encouragement are key to fostering a love for soccer at this early stage. A supportive environment helps children develop at their own pace, laying the groundwork for future growth in the sport.

Warm-Up and Basic Skills

A fun warm-up with light movement and basic soccer skills introduces young players to the game. Focus on simple drills, like running with the ball, to build coordination and excitement for learning foundational techniques.

Fun Warm-Up Activities

Engage young players with lively warm-up games that blend movement and laughter. Activities like “Soccer March,” where kids march in place while tapping the ball, or “Animal Moves,” where they hop like frogs or crawl like bears, keep energy high. Incorporate simple stretches, like toe touches or leg swings, to prepare muscles for play. Games like “Red Light, Green Light” with a soccer twist encourage listening skills and teamwork. End with a quick round of “Simon Says” to focus their attention. These exercises are short, fun, and designed to get them moving while introducing basic soccer concepts in a playful, non-competitive way.

Ball control is a fundamental skill for young soccer players, and introducing it in a fun, engaging way is key. Start with simple exercises like rolling the ball gently with the sole of the foot or using the inside of the foot to push it forward. Use cones or small obstacles to create a pathway for the ball, encouraging kids to navigate through while maintaining control. Games like “Ball in a Box” or “Roll and Stop” can make learning exciting. Keep drills short and repetitive, allowing children to build confidence and coordination gradually. Praise their efforts to foster a positive learning environment and celebrate small improvements. This foundational skill will help them progress in more complex drills later. Always keep it fun and age-appropriate to ensure engagement and development.

Basic Dribbling Techniques

Introducing basic dribbling techniques to 5-year-olds should be fun and engaging. Start with simple exercises like “Dribble Around the Cone” or “Dribble to a Partner.” Use cones or markers to create a zigzag path for kids to dribble through, encouraging them to use the inside and outside of their feet. Incorporate games like “Dribble Tag,” where one player tries to tag others while they dribble. This helps improve control and agility. Keep drills short and repetitive, allowing children to build muscle memory. Focus on keeping the ball close to their feet and maintaining balance. Positive encouragement and small challenges will keep them motivated and excited to improve their skills. Make sure to demonstrate each technique clearly and provide plenty of opportunities for practice.

Simple Passing Drills

Simple passing drills for 5-year-olds focus on developing basic ball control and teamwork. Start with stationary partner passing, where kids roll or push the ball back and forth using the inside of their feet. Gradually introduce movement by having them pass while taking small steps. Incorporate fun games like “Passing Relay,” where teams line up and pass the ball to their teammate, racing to see who finishes first. Use soft balls or even balloons for younger players to make it safer and more engaging. Keep drills short, positive, and repetitive to build confidence and coordination. Encourage kids to communicate and celebrate their successes together.

Ball Control Drills

Ball control drills for 5-year-olds focus on fun, age-appropriate activities to develop coordination and confidence. Using soft balls or balloons, kids practice rolling, tapping, and dribbling through cones. Incorporate music or colors for engagement. Keep it positive and fun!

Red Light, Green Light Dribbling

Set up a course with cones or markers. Players start at one end with a ball. The coach calls “green light” for players to dribble toward the finish line and “red light” to stop; If a player dribbles during a red light, they go back. Add fun by having players freeze or hop on one foot. For younger kids, use larger spaces and slower movements. Incorporate music or sound effects for engagement. This drill improves dribbling control, listening skills, and self-control. Encourage creativity by letting kids take turns as the “stoplight.” Keep it lively and fun to maintain their interest and energy levels during practice sessions.

Dribble Through Cones

Set up a zigzag or straight path using cones. Players start at one end and must dribble through the course to the finish line. Encourage proper ball control by using the inside, outside, and sole of the foot. For older players, add more cones or tighter spaces to increase difficulty. For younger players, use fewer cones and wider paths. Time players and challenge them to beat their time on subsequent attempts. Add variations like dribbling with different parts of the foot or incorporating moves like step-overs or inside cuts. This drill improves ball control, agility, and focus. Make it fun by adding music or turning it into a race. Encourage creativity and praise effort to build confidence and skill.

Ball Maze Challenge

Set up a maze using cones, creating a winding path for players to navigate. Each player starts at the entrance with a ball and must dribble through the maze to the exit. Encourage using different parts of the foot to control the ball tightly. Add variations like sharp turns or small gaps to test precision. For younger players, widen the path, and for older players, narrow it. Time each attempt and challenge players to improve their speed. Add music or fun sounds to make it engaging. This drill enhances ball control, agility, and focus while providing a fun, creative challenge. Celebrate progress and effort to build confidence and mastery of the ball.

Shooting and Scoring

Focus on fun, age-appropriate drills to develop shooting accuracy and confidence. Use small goals and soft balls for safety. Incorporate target practice and relays to make it engaging. Encourage teamwork and celebrate every attempt to build enthusiasm for scoring.

Target Practice Shooting

Set up a series of small cones or markers as targets. Players line up and take turns shooting soft balls into the targets. Start with stationary shots, then gradually introduce moving targets or angled shots. Encourage proper shooting technique, such as using the laces and following through. Make it engaging by timing players or turning it into a team competition. This drill improves accuracy, power, and confidence. Keep the atmosphere fun by celebrating successful shots. Rotate roles to ensure everyone gets plenty of attempts. For younger players, use larger targets to build confidence before narrowing the challenge. Limit practice to 10-15 minutes to maintain focus and energy levels.

Shooting Relays

Divide players into teams and set up a course with small goals or cones as targets. Each player must dribble through the course, shoot into the target, and return to tag the next teammate. Add variety by incorporating different shooting techniques, such as volleys or using weaker feet. The first team to complete the relay wins. Keep it fun by adding a race element or creative challenges. This drill builds teamwork, shooting accuracy, and endurance. Encourage celebration of successful shots and teamwork efforts. Adjust the course length based on skill levels. Practice for 10-15 minutes to maintain engagement and energy. This activity promotes excitement and improves technical skills in a dynamic setting;

Mini Goal Challenges

Set up multiple mini goals (or cones representing goals) in a grid or scattered formation. Players line up and take turns shooting into the goals. Assign points for accuracy, with bonus points for hitting specific targets. Add a time limit to increase excitement. Vary the distance from the goals to challenge shooting range. Rotate players to ensure everyone gets equal opportunities. Encourage creative shots, such as using different parts of the foot. Celebrate successful shots to boost confidence. This drill improves aim, technique, and decision-making while keeping the atmosphere fun and competitive. It’s an excellent way to develop scoring instincts in young players. Adapt the difficulty by adjusting goal sizes or distances as skills progress. Keep the session lively to maintain engagement and enjoyment.

Team Play and Coordination

Foster teamwork and coordination through fun, interactive drills. Encourage passing, communication, and basic tactics. Use games like “Pass and Move” to develop collaboration and spatial awareness. Incorporate small-sided scrimmages to practice working together toward a common goal. Keep activities engaging and age-appropriate to build confidence and camaraderie among young players.

Pass and Move Drills

Pass and move drills are essential for teaching young players teamwork and coordination. Set up cones in a zigzag pattern or a small grid. Players line up and take turns passing the ball through the course, focusing on accuracy and movement. Add a partner for passing drills, encouraging communication and timing. Gradually increase difficulty by adding defenders or time limits. Emphasize the importance of staying in motion after passing to create scoring opportunities. Reward teamwork and celebrate successful plays to build confidence and camaraderie. These drills improve passing accuracy, movement, and decision-making while fostering a sense of unity among players. Always keep it fun and engaging for 5-year-olds!

2v2 Scrimmage

A 2v2 scrimmage is a great way to introduce young players to game-like situations. Use small goals or cones to create a mini field. Divide players into teams of two and let them play short, timed matches. Encourage them to work together, pass, and shoot. Keep the rules simple and focus on fun. Rotate teams frequently to ensure everyone gets equal playtime. This drill helps improve decision-making, teamwork, and basic ball control. Coaches can offer gentle guidance, such as reminding players to spread out and communicate. It’s a fantastic way to build excitement and apply skills learned in practice. Always emphasize sportsmanship and teamwork over competition. This age group thrives in engaging, dynamic activities that feel like play!

Cooperative Goal Scoring

Cooperative goal scoring is a fun and engaging drill that fosters teamwork and collaboration. Set up two small goals or use cones to create target zones. Divide players into small groups and have them work together to score by passing and moving the ball into the opposing goal. Encourage each player to contribute, emphasizing that everyone’s participation is crucial. For younger players, simplify the rules and focus on teamwork rather than competition. Praise effort and celebrate successful attempts to build confidence. This activity helps develop basic ball control, decision-making, and communication skills. It’s a great way to teach young players the value of working together toward a common goal while keeping the game enjoyable and interactive. Positive reinforcement is key to making this drill effective and rewarding for all participants.

Game-Like Situations

Game-like situations help young players adapt to real match scenarios, improving decision-making and reaction skills. Simple, fun drills simulate actual game conditions, enhancing learning through engaging practice.

Small-Sided Games

Small-sided games, such as 2v2 or 3v3, are ideal for young players. These games simplify soccer, focusing on basic skills like dribbling, passing, and shooting in a fun, engaging way. They promote teamwork, decision-making, and spatial awareness while keeping all players involved. Short, fast-paced matches ensure continuous action, maintaining children’s interest and energy levels. These games also allow coaches to observe and guide players in real-game scenarios, fostering improvement. The smaller format reduces complexity, making it easier for 5-year-olds to understand and enjoy the game. Most importantly, small-sided games encourage creativity and love for soccer while developing essential skills.

Capture the Flag Variations

Capture the Flag Variations is a fun, engaging activity that combines soccer skills with teamwork. Adapted for young players, this game involves two teams trying to “capture” a flag while defending their own. Instead of traditional flags, use cones or small objects placed near goals. Players must dribble to the opposing team’s side, collect the flag, and return without losing possession. This activity promotes teamwork, strategy, and physical activity while keeping the game exciting. It also helps improve ball control and decision-making in a dynamic setting. The simplicity of the rules makes it perfect for 5-year-olds, ensuring everyone stays involved and enjoys the experience.

Free Play Exploration

Free Play Exploration is a vital component of soccer drills for 5-year-olds, allowing children to express creativity and explore the game independently. By providing an open space with minimal rules, kids can experiment with ball control, dribbling, and shooting in a stress-free environment. This approach encourages natural learning, as children discover new skills through trial and error. Coaches and parents should observe and offer subtle guidance, ensuring safety while fostering a sense of freedom. Free play helps build confidence, creativity, and a genuine love for the game. It also promotes physical activity and teamwork, as children naturally collaborate during unstructured play. This method keeps young players engaged and excited about learning soccer.

Nutrition and Recovery

Proper nutrition and recovery are crucial for young soccer players. Balanced meals, hydration, and adequate rest help maintain energy and support healthy growth.

Healthy Snacks for Energy

For young soccer players, healthy snacks are essential to maintain energy levels. Fresh fruits like apples, bananas, and berries are ideal, providing natural sugars and essential vitamins. Yogurt is another excellent option, offering protein to sustain energy. Trail mix with nuts and dried fruits can be convenient, but opt for versions with minimal added sugar. Veggie sticks with hummus or guacamole dip provide fiber and nutrients. Whole-grain crackers or wraps with lean fillings like turkey or cheese are also great choices. Avoid sugary snacks and drinks, as they can lead to energy crashes. These snacks are easy to prepare, portable, and perfect for keeping young athletes energized during practices and games.

Hydration Tips

Hydration is vital for young soccer players to maintain energy and focus. Encourage sips of water before, during, and after practice. Use small, lightweight water bottles that are easy for 5-year-olds to handle. Add slices of lemon or orange for a refreshing taste. Remind children to drink water regularly, even if they don’t feel thirsty. Parents and coaches should set a good example by drinking water themselves. Avoid sugary drinks, as they can lead to energy crashes. Make hydration breaks fun by incorporating short games or chants to create a positive association. Proper hydration helps prevent fatigue and ensures young athletes perform at their best during drills and games.

Post-Practice Cool-Down

A proper cool-down after soccer drills helps young players relax and recover. Start with gentle stretches for legs, arms, and backs, using fun names like “touch the toes” or “butterfly wings.” Incorporate slow, deep breathing exercises to calm their minds. End with a short, slow-motion march or balance poses to promote focus. Avoid intense movements to prevent overexertion. Use this time to praise their efforts and encourage teamwork. A cool-down routine not only aids physical recovery but also reinforces discipline and mindfulness. Keep it short and engaging, ensuring it’s a positive end to practice. This routine helps young athletes wind down and prepares them for the next activity with renewed energy and focus.

Mental Preparation

Mental preparation helps young players stay focused and confident. Use visualization techniques, positive affirmations, and breathing exercises to build resilience and a winning mindset in soccer drills.

Positive Reinforcement Techniques

Positive reinforcement is key in developing young players’ confidence and love for soccer. Use verbal praise like “Great job!” or “Well done!” to celebrate efforts. Non-verbal cues, such as thumbs-ups or high-fives, also boost morale. Reward systems like stickers or stars for achievements encourage consistency. Focus on effort rather than results, emphasizing progress over perfection. Create a supportive environment where mistakes are seen as learning opportunities. Keep drills fun and engaging to maintain excitement. Use positive language to guide improvement, such as “Try again, you’re almost there!” This approach fosters resilience, teamwork, and a growth mindset, essential for young athletes’ development in soccer drills designed for 5-year-olds.

Building Confidence

Building confidence in young soccer players is crucial for their development. Start with simple, achievable tasks like kicking a ball into a small goal or dribbling through cones. Celebrate small successes to create a sense of accomplishment. Use encouraging phrases like “You’ve got this!” or “Look at you go!” to instill self-belief. Allow players to attempt drills multiple times, emphasizing effort over perfection. Pairing players with slightly more skilled peers can also boost their confidence. Encourage teamwork by celebrating collective achievements, fostering a sense of belonging. Provide structured yet fun challenges that gradually increase in difficulty, helping players feel capable and proud of their progress in soccer drills tailored for 5-year-olds.

Focus and Concentration Exercises

Focus and concentration exercises are essential for young soccer players to improve their attention and performance. Simple games like “Follow the Leader” with specific movements can help them focus on instructions. Use visual cues, such as pointing to different colored cones, to test their ability to concentrate. Incorporate short, fun tasks like balancing a ball on the foot or head while counting aloud. These exercises enhance their ability to stay engaged during drills. Keep activities brief and engaging to maintain their interest, as 5-year-olds naturally have shorter attention spans. Over time, these exercises will improve their ability to stay focused during practices and games, aiding their soccer development.

Practice Plans and Resources

Effective practice plans include age-appropriate drills, structured sessions, and fun activities. Utilize printable PDF guides and online resources for coaches to organize engaging and efficient training sessions.

Sample Practice Schedule

A well-structured practice schedule for 5-year-olds should balance fun and learning. Begin with a 10-minute warm-up, including light jogging and dynamic stretches. Dedicate 15 minutes to ball control drills, such as dribbling through cones or around small obstacles. Incorporate a 5-minute water break to keep energy levels high. Next, focus on passing techniques for 10 minutes using simple, close-range exercises. Conclude with a 10-minute shooting activity, aiming at mini goals or targets. End the session with a 5-minute cool-down, including stretching and positive reinforcement. Downloadable PDF schedules often include visual aids and step-by-step instructions, making it easier for coaches to follow and adapt to their team’s needs.

PDF Resources for Coaches

Coaches can access a variety of downloadable PDF guides specifically designed for soccer drills tailored to 5-year-olds. These resources often include detailed diagrams, step-by-step instructions, and age-appropriate activities. Many PDFs focus on fostering fundamental skills like dribbling, passing, and shooting through engaging games. They also emphasize fun and safety, ensuring young players stay motivated. Popular resources include drills organized by skill level, warm-up routines, and small-sided game ideas. Websites like USSSA, SoccerU, and Coaching Kids Football offer free or affordable PDF downloads. These materials are perfect for creating structured, enjoyable practices that promote development and teamwork. Coaches can print or share these guides, making them versatile tools for planning sessions.

Online Communities and Forums

Online communities and forums are invaluable resources for coaches seeking soccer drills for 5-year-olds. Platforms like Reddit’s r/Coaching or r/SoccerCoaches, as well as Facebook groups dedicated to youth soccer, offer spaces to share ideas and learn from experienced coaches. These forums often feature discussions on age-appropriate drills, tips for engaging young players, and advice on creating fun, dynamic practices. Many users share PDF resources, videos, and creative approaches to teaching fundamental skills. Coaches can also ask questions, receive feedback, and gain inspiration from others in the field. These online spaces foster collaboration and provide a wealth of knowledge for developing effective and enjoyable training sessions tailored to young athletes.

Soccer drills for 5-year-olds should be fun, engaging, and focused on building fundamentals. By keeping practices enjoyable and age-appropriate, coaches and parents can foster a lifelong love for the sport while nurturing confidence and teamwork skills.

A comprehensive guide to soccer drills for 5-year-olds should emphasize fun, simplicity, and age-appropriate activities. Drills must focus on developing basic skills like dribbling, passing, and shooting while encouraging teamwork. Incorporate games that promote coordination, balance, and spatial awareness. Use visual cues and positive reinforcement to maintain engagement. Keep practice sessions short and structured to cater to young attention spans. Include warm-up routines and cool-down stretches to ensure safety and proper physical preparation. Provide clear instructions and demonstrate techniques to help children understand and imitate. Encourage parental involvement to create a supportive environment. Prioritize building confidence and a love for the sport over competitive outcomes. Ensure activities are adaptable to varying skill levels and abilities. By focusing on these elements, coaches and parents can deliver effective and enjoyable training sessions for young players.

Encouragement for Continuous Learning

Encouraging continuous learning in young soccer players is essential for their development. Praise effort, not just results, to foster a growth mindset. Celebrate small achievements, like improved dribbling or passing, to build confidence. Make practice sessions fun and engaging, ensuring children stay motivated. Provide opportunities for repetition and progression, allowing skills to develop naturally. Offer constructive feedback paired with positive reinforcement to guide improvement. Encourage players to try new techniques and embrace challenges. Remind them that mistakes are part of the learning process. Foster teamwork by emphasizing collaboration and mutual support. Share success stories and highlight the joy of learning. By creating a nurturing environment, you inspire a lifelong love for the sport and a commitment to continuous growth. Use resources like soccer drills for 5-year-olds PDFs to help structure engaging sessions that promote development and fun.

Final Tips for Coaches and Parents

Coaches and parents play a vital role in shaping young players’ soccer journeys. Always prioritize fun and engagement to keep children motivated. Use simple, clear instructions and demonstrate drills to ensure understanding. Be patient and celebrate progress, no matter how small. Encourage teamwork and sportsmanship, fostering a supportive environment. Provide individual attention to help each child improve at their own pace. Keep practices organized but flexible, adapting to the group’s energy levels. End sessions on a positive note, leaving players excited for the next practice. Utilize soccer drills for 5-year-olds PDFs for fresh ideas and structured activities. Most importantly, nurture a love for the game while helping children develop essential skills. Safety, hydration, and positive reinforcement should always be top priorities. By creating a joyful and educational experience, you’ll help build confident, skilled, and passionate young athletes. Remember, consistency and patience are key to their growth and enjoyment of soccer.

interview questions instructional coach

An instructional coach supports teachers in enhancing instructional practices to improve student outcomes. Coaches act as mentors‚ providing resources and professional development opportunities to educators. This role combines leadership‚ collaboration‚ and data-driven strategies to foster continuous improvement in teaching and learning environments.

Coaches work closely with teachers to identify areas for growth and implement evidence-based practices. Their ultimate goal is to empower educators‚ ensuring they have the tools and confidence needed to create impactful learning experiences for all students.

What is your understanding of the role of an instructional coach?

An instructional coach is a professional who works collaboratively with teachers to enhance teaching practices and improve student learning outcomes. The role involves providing personalized support‚ sharing evidence-based strategies‚ and fostering a culture of continuous improvement. Coaches act as mentors‚ offering guidance on curriculum design‚ instructional techniques‚ and data-driven decision-making. They facilitate professional development opportunities and encourage reflective practice among educators. Additionally‚ instructional coaches often help teachers analyze student performance data to identify areas of strength and improvement. Their goal is to empower teachers with the tools‚ confidence‚ and knowledge needed to create engaging and effective learning environments. By building trust and fostering collaboration‚ instructional coaches play a pivotal role in advancing educational excellence and supporting the growth of both educators and students.

Ultimately‚ the role is about enabling teachers to excel in their profession‚ which in turn benefits students and the broader school community.

Why do you want to be an instructional coach?

I am passionate about education and dedicated to helping teachers grow professionally. Becoming an instructional coach allows me to make a broader impact by supporting educators in improving their practices‚ which ultimately benefits students. I find joy in collaborating with teachers‚ sharing strategies‚ and helping them overcome challenges. This role aligns with my commitment to fostering a culture of continuous improvement and lifelong learning. I am motivated by the opportunity to empower educators‚ as their growth directly enhances student outcomes. Coaching enables me to contribute to the educational community in a meaningful way‚ combining my teaching experience with leadership skills to drive positive change.

Seeing teachers succeed and knowing that their students will thrive as a result is incredibly fulfilling. This role is a natural progression of my dedication to education and my desire to make a lasting difference.

What challenges do you anticipate in this role‚ and how would you address them?

As an instructional coach‚ I anticipate challenges such as resistance to change‚ varying teacher readiness for professional development‚ and balancing multiple responsibilities; To address these‚ I would build trust through active listening and demonstrating my commitment to supporting teachers. I would also offer personalized coaching tailored to individual needs‚ fostering a collaborative environment where teachers feel comfortable seeking help. Additionally‚ I would communicate clearly about the benefits of new strategies and involve teachers in the decision-making process to encourage buy-in. By staying organized‚ prioritizing tasks‚ and leveraging data to inform my approaches‚ I would manage my workload effectively while maintaining a focus on student-centered outcomes.

Ultimately‚ my goal is to create a supportive and inclusive culture that encourages continuous improvement and shared success.

Teaching and Leadership Experience

My extensive teaching and leadership experience has equipped me with the skills to support educators effectively. I have led professional development workshops‚ mentored new teachers‚ and implemented school-wide initiatives to enhance teaching practices.

Can you describe your teaching experience and how it prepares you for this role?

My teaching experience spans over a decade‚ during which I have worked with diverse student populations and developed a deep understanding of effective instructional strategies. I have taught various grade levels and subjects‚ which has honed my ability to adapt to different learning needs and create engaging lessons. This experience has also taught me the importance of building strong relationships with students‚ parents‚ and colleagues.

As a teacher‚ I consistently used data to inform my instruction‚ monitored student progress‚ and implemented interventions to address gaps in learning. These skills are directly transferable to the role of an instructional coach‚ where I can support teachers in analyzing data‚ refining their practices‚ and fostering a growth mindset in their classrooms. Additionally‚ my experience in mentoring new teachers and leading professional development workshops has prepared me to coach educators effectively‚ helping them enhance their teaching strategies and improve student outcomes.

How have you previously supported other educators in their professional development?

Throughout my career‚ I have actively supported educators in their professional growth by mentoring new teachers‚ leading professional development workshops‚ and facilitating collaborative planning sessions. As a mentor‚ I provided one-on-one coaching‚ offering feedback on lesson plans and instructional strategies. I also organized school-wide workshops on topics such as differentiated instruction and technology integration‚ which helped educators enhance their teaching practices.

In addition‚ I facilitated professional learning communities (PLCs) where teachers collaborated to share best practices‚ analyze student data‚ and develop targeted interventions. By fostering a culture of continuous improvement‚ I empowered educators to reflect on their practices and implement changes that positively impacted student learning. These experiences have prepared me to support teachers effectively in their professional development as an instructional coach.

What leadership roles have you held‚ and how have they shaped your approach to coaching?

During my career‚ I have served as a department chair‚ grade-level team leader‚ and curriculum development committee member. These roles have honed my ability to lead collaboratively‚ communicate effectively‚ and empower others. As a department chair‚ I facilitated meetings‚ set goals‚ and managed budgets‚ which taught me the importance of organization and clear vision.

These leadership experiences have shaped my coaching approach by emphasizing the value of building trust‚ active listening‚ and fostering collaboration. I learned to create a supportive environment where educators feel comfortable taking risks and seeking feedback. My leadership roles also taught me to approach challenges with a solutions-oriented mindset‚ which I now apply to help teachers overcome obstacles and grow professionally.

Data-Driven Instruction

Data-driven instruction involves using assessment results‚ progress monitoring‚ and student performance metrics to guide teaching strategies. Coaches help teachers analyze these insights to make informed decisions‚ ensuring targeted support and improved student outcomes.

What types of data do you find most useful for guiding instruction?

Formative and summative assessment data are invaluable for guiding instruction‚ as they provide insights into student progress and understanding. Standardized test scores offer a broader perspective on student performance‚ while progress monitoring data helps track growth over time. Additionally‚ classroom observation notes and teacher feedback can provide qualitative insights. I also find value in analyzing student work samples and performance tasks‚ as they reveal application of skills. By synthesizing these data types‚ coaches can identify patterns‚ pinpoint areas for improvement‚ and inform coaching strategies that address specific student needs. This balanced approach ensures that instruction is tailored‚ impactful‚ and aligned with learning goals.

How do you assist teachers in using assessment data to improve student outcomes?

To help teachers effectively use assessment data‚ I start by collaboratively analyzing the data to identify trends‚ strengths‚ and areas for improvement. I work with teachers to set specific‚ measurable goals for student growth and develop targeted instructional strategies. Providing professional development on how to interpret and apply data is crucial‚ ensuring teachers feel confident in using it to inform their instruction. I also offer resources and tools‚ such as data visualization templates or progress monitoring charts‚ to make data analysis more accessible. Additionally‚ I facilitate regular check-ins to review student progress and adjust teaching methods as needed. By fostering a data-driven mindset and offering ongoing support‚ I empower teachers to make informed decisions that directly impact student success and achievement.

Can you provide an example of how you’ve used data to inform coaching strategies?

In one instance‚ I analyzed student performance data from a reading assessment‚ which revealed that a significant number of students were struggling with comprehension skills. I shared these findings with the teacher and collaboratively identified areas where instructional strategies could be adjusted. Together‚ we developed a coaching plan that included modeling targeted reading comprehension techniques‚ such as think-alouds and graphic organizers. I also provided the teacher with resources for differentiated instruction and conducted follow-up coaching cycles to monitor progress. By using the data to pinpoint specific needs‚ we were able to implement tailored strategies that resulted in a noticeable improvement in student performance on subsequent assessments. This experience highlighted the power of data-driven decision-making in coaching and its positive impact on student outcomes.

Instructional Strategies

Effective instructional strategies engage students‚ promote active learning‚ and cater to diverse needs. Coaches help teachers implement evidence-based methods‚ fostering innovation and improving student outcomes through tailored approaches.

What instructional strategies do you believe are most effective‚ and why?

The most effective instructional strategies are those that promote active learning‚ differentiation‚ and engagement. Strategies like project-based learning‚ formative assessments‚ and technology integration are particularly impactful. Project-based learning encourages critical thinking and real-world application‚ while formative assessments allow for timely feedback and adjustments. Technology integration enhances accessibility and engagement‚ making learning interactive and relevant. Differentiated instruction ensures that all learners’ needs are met‚ regardless of ability or background. These strategies foster a student-centered approach‚ encourage collaboration‚ and support deeper understanding. They are effective because they address diverse learning styles‚ promote equity‚ and prepare students for future challenges. By incorporating these strategies‚ educators can create dynamic‚ inclusive learning environments that drive meaningful outcomes.

How do you help teachers implement new teaching methods?

Helping teachers implement new teaching methods begins with building trust and collaboration. I start by understanding their current practices and identifying areas where new methods could enhance student learning. I then provide professional development opportunities‚ such as workshops or one-on-one coaching‚ to introduce the strategies. Modeling lessons and co-teaching are effective ways to demonstrate new techniques in real-time. Additionally‚ I offer resources like lesson plans‚ research‚ and tools to support their implementation. Ongoing feedback and encouragement are crucial to help teachers feel confident and motivated. I also facilitate peer collaboration‚ allowing teachers to share experiences and best practices. By creating a supportive environment and providing practical support‚ I empower teachers to successfully integrate innovative methods into their classrooms‚ leading to improved instruction and student outcomes.

What role do you think technology plays in enhancing instruction?

Technology plays a pivotal role in enhancing instruction by providing teachers and students with innovative tools and resources. It allows for personalized learning experiences‚ enabling teachers to tailor instruction to meet individual student needs. Digital platforms and educational software offer interactive and engaging ways to present content‚ increasing student motivation and understanding. Technology also facilitates access to a wealth of information‚ promoting critical thinking and research skills. Additionally‚ it supports data-driven decision-making‚ allowing teachers to track student progress and adjust instruction accordingly. Tools like learning management systems and collaboration platforms enhance communication and teamwork among students and educators. Overall‚ technology serves as a powerful catalyst for modernizing education‚ making it more dynamic‚ inclusive‚ and effective in preparing students for the future.

Communication and Collaboration

Effective communication and collaboration are essential for fostering a supportive learning environment. Building trust through active listening and open dialogue ensures productive partnerships with teachers and stakeholders.

How do you build trust and rapport with teachers?

Building trust and rapport with teachers is foundational to effective instructional coaching. I prioritize active listening‚ empathy‚ and open communication to create a safe and supportive environment. By acknowledging teachers’ expertise and experiences‚ I foster mutual respect and collaboration. Consistency in my actions and following through on commitments reinforce credibility. I also focus on shared goals‚ involving teachers in decision-making processes to ensure alignment and ownership. Cultural responsiveness is key‚ as I strive to understand and respect diverse backgrounds and teaching styles. Through these approaches‚ I establish strong‚ trusting relationships that facilitate growth and partnership.

Can you describe your approach to effective communication in a coaching relationship?

My approach to effective communication in a coaching relationship is rooted in clarity‚ empathy‚ and active listening. I prioritize creating a collaborative dialogue where teachers feel heard and valued. I use open-ended questions to encourage reflection and deeper thinking‚ while also providing specific‚ actionable feedback. Non-verbal cues‚ such as maintaining eye contact and nodding‚ help build connection and show engagement. I adapt my communication style to meet the needs of individual teachers‚ whether through informal check-ins‚ structured meetings‚ or written follow-ups. Regularly seeking feedback ensures that my communication is impactful and aligned with their goals. By fostering a transparent and supportive exchange‚ I establish a strong foundation for professional growth and collaboration.

How do you facilitate collaboration among teachers?

Fostering collaboration among teachers is essential for creating a cohesive and supportive educational environment. I facilitate collaboration by encouraging open communication and mutual respect. I organize regular professional learning communities (PLCs) where teachers can share strategies‚ discuss challenges‚ and align practices. By promoting a growth mindset‚ I help teachers view collaboration as a way to enhance student outcomes. I also act as a connector‚ identifying common interests or goals among staff and pairing them for joint projects. Providing structured time for collaborative planning and ensuring active listening are key to building trust. I encourage teachers to observe each other’s classrooms and provide feedback‚ which strengthens teamwork and innovation. Celebrating successes and addressing conflicts constructively further nurture a collaborative culture. Ultimately‚ my role is to empower teachers to work together effectively‚ leveraging their collective expertise to benefit all students.

Professional Development

Professional development opportunities include workshops‚ mentoring programs‚ and peer observations. These activities are aligned with school goals and teacher needs‚ fostering continuous improvement and enhancing instructional strategies effectively.

What professional development opportunities would you recommend for teachers?

To support teacher growth‚ I recommend professional development opportunities such as workshops‚ mentoring programs‚ and peer observations. These activities should focus on evidence-based practices‚ technology integration‚ and culturally responsive teaching. Additionally‚ offering opportunities for teachers to attend conferences‚ engage in collaborative planning‚ and participate in coaching cycles can enhance their skills. Providing time for self-directed learning‚ such as online courses or book studies‚ allows teachers to pursue areas of personal interest. Tailoring professional development to address school-specific needs ensures relevance and impact. By aligning these opportunities with teacher goals and student needs‚ educators can develop the skills and confidence to improve instructional practices and student outcomes effectively.

How do you stay current with best practices in education?

To stay current with best practices in education‚ I engage in ongoing professional learning through various channels. I regularly read educational journals‚ such as Educational Leadership and Teaching Tolerance‚ to stay informed about research-based strategies. I also attend conferences‚ workshops‚ and webinars‚ such as those offered by ASCD or EdSurge‚ to learn from experts and network with educators; Additionally‚ I participate in online communities and forums‚ like Edutopia and Twitter chats (e.g.‚ #EdChat)‚ to share ideas and gain insights from practitioners. I collaborate with colleagues through professional learning communities (PLCs) and book studies to explore innovative teaching methods. Finally‚ I subscribe to educational blogs and podcasts‚ such as Cult of Pedagogy and The EdPod‚ to stay updated on trending topics and evidence-based practices in real time.

How do you assess the professional development needs of a school or district?

To assess professional development needs‚ I collaborate with school leaders and teachers to identify gaps and priorities. I review student performance data‚ classroom observation findings‚ and teacher feedback to pinpoint areas for improvement. Conducting surveys and focus groups with educators helps uncover their specific challenges and interests. Additionally‚ I analyze the school’s or district’s strategic goals and compare them with current instructional practices. This comprehensive approach ensures that professional development opportunities are targeted‚ relevant‚ and aligned with both teacher needs and organizational objectives. By involving stakeholders in the process‚ I foster a culture of continuous improvement and ensure that PD initiatives are impactful and sustainable.

Problem-Solving Scenarios

This section explores real-world challenges in education‚ offering practical solutions and strategies for addressing common issues faced by instructional coaches‚ teachers‚ and school leaders.

Tell me about a time you helped a teacher overcome a specific challenge.

In one instance‚ a teacher was struggling with classroom management‚ particularly with engaging students during lessons. I observed the classroom and identified that the lack of interactive activities and differentiation in instruction were key issues. I collaborated with the teacher to design lesson plans incorporating hands-on tasks and technology integration. Additionally‚ I facilitated a professional development session on differentiated instruction. Over time‚ classroom engagement improved‚ and the teacher reported better student behavior and academic performance. This experience highlighted the importance of tailored support and collaborative problem-solving in coaching.

How would you handle resistance from a teacher who is hesitant to change their methods?

When encountering resistance from a teacher hesitant to change‚ I prioritize building trust and understanding their perspective. I start by actively listening to their concerns and acknowledging the effort they’ve already invested in their teaching practices. This helps establish a safe and respectful environment for dialogue. Next‚ I collaboratively explore the reasons behind their hesitation‚ whether it’s fear of failure‚ lack of confidence‚ or skepticism about the new method. Together‚ we set small‚ achievable goals and identify incremental steps for implementation. I also offer support‚ such as modeling lessons‚ providing resources‚ or co-teaching to reduce anxiety. By focusing on the benefits for student learning and celebrating progress‚ I help the teacher see the value in change. Patience and empathy are key to fostering a growth mindset and encouraging gradual shifts in practice.

Describe a situation where you had to mediate a conflict between teachers.

In one instance‚ two teachers disagreed on classroom management strategies‚ leading to tension. I scheduled a private meeting with both to understand their perspectives. By actively listening and acknowledging their concerns‚ I created a neutral space for open dialogue. I guided them to focus on shared goals—student success and a positive school environment. Together‚ we brainstormed a compromise that blended their approaches. I encouraged collaboration and mutual respect‚ helping them see the value in diverse methods. Over time‚ they developed a more cohesive strategy‚ improving their working relationship. This experience reinforced the importance of empathy‚ active listening‚ and fostering collaboration in resolving conflicts effectively.

Cultural Responsiveness and Equity

Culturally responsive coaching involves understanding and valuing diverse backgrounds. I promote equity by addressing biases‚ ensuring inclusive practices‚ and supporting teachers in meeting all students’ unique needs effectively.

How do you ensure that your coaching practices are culturally responsive?

To ensure culturally responsive coaching‚ I prioritize understanding the diverse backgrounds and experiences of both teachers and students. I engage in ongoing professional development to deepen my knowledge of culturally responsive practices. By actively listening to teachers’ perspectives and incorporating student data‚ I tailor my coaching strategies to meet the unique needs of each classroom. I also encourage teachers to reflect on their own biases and promote the use of inclusive materials. Building trust through empathy and respect is central to my approach. Additionally‚ I collaborate with teachers to create learning environments that value diversity and foster equity. This includes providing resources and strategies that address the cultural and linguistic diversity of students‚ ensuring all learners feel seen and supported. Continuous self-reflection and a commitment to equity guide my coaching practices.

What strategies do you use to promote equity in education?

Promoting equity in education requires intentional strategies to ensure all students have access to opportunities for success; I start by analyzing data to identify disparities in student outcomes‚ then work with teachers to develop targeted interventions. Differentiated instruction is a key strategy‚ ensuring that lessons meet the needs of diverse learners. I also advocate for culturally responsive materials and inclusive practices that reflect students’ backgrounds. Professional development focused on implicit bias and equity helps educators recognize and address systemic barriers. Additionally‚ I encourage teachers to build strong relationships with students and families‚ fostering a sense of belonging. By addressing the root causes of inequities and providing tailored support‚ I help create learning environments where every student can thrive. Equity is not just a goal but a commitment that guides every aspect of my coaching practice.

How do you support teachers in addressing the diverse needs of their students?

To support teachers in addressing diverse student needs‚ I collaborate with them to design differentiated instruction tailored to various learning styles‚ abilities‚ and cultural backgrounds. I provide resources and training on strategies such as Universal Design for Learning (UDL) and scaffolding techniques to ensure accessibility. Encouraging the use of formative assessments helps teachers identify individual student needs and adjust instruction accordingly. I also model inclusive practices‚ such as incorporating diverse texts and materials‚ and assist in creating flexible grouping strategies. Additionally‚ I help teachers integrate technology tools that personalize learning experiences. By offering coaching cycles focused on specific student needs and providing feedback‚ I empower teachers to create equitable and engaging classrooms. My goal is to ensure every student feels valued and has the support necessary to succeed.